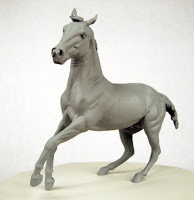
This about my new stock horse sculpture, first introduced last year in this blog entry.
The next gratitude must be expressed to the brave folks that examined him in person back then, and gave me constructive criticism. Some additional notes came via email and phone, from people who sincerely love model horses; it is so nice to have such support and encouragement in the pursuit of excellence. To those who were entirely thrilled with the first stage of him, and loved him as he was: I hope you can see what I see now.
A comparative analysis, showing side-by-side images of old and new, is a pretty soul-bearing experience for an artist. Some people never talk about this aspect of the process, maybe because they don't want to admit error. That omission may lead others to think it never happens to the professionals. Here is what a growth spurt in sculpture looks like, and trust me, there are growth pains.

And after the dust settles:

Wait! What just happened there? First, he had major body surgery, including being cut in half and having length added to his torso. Because he was sculpey and epoxy, his torso pretty much broke up under the saw, and had to be stabilized. Next, his withers were defined, his loins bunched further back to remove the "roachback", and all of his major muscle quarters were re-assessed. I found that the muscle groups along the curve from his point of buttock to Achilles tendon, were short, narrow, or just didn't tie right for a stock breed. Every single one, both sides! Here is the old construction, with my drawn-on guides for where the new muscle edges should lay:

Here is the finished area:

A little further down the hind legs, I could not stand his stance. He wasn't showing enough flexion to be engaging and crouching. One could imagine a horizontal line through the hocks, and the two sides were doing two different things. I broke his pasterns and fetlocks, then bent and cut the armature wire underneath, when the pieces fell off! Brrrrutal!

Then, I realized that to see what I was doing with the bones and tendons, I needed to shave his feathers and coronets. Nothing was lining up until the hair was removed, and then, of course, all the tendons had to be resculpted from scratch.

Finally, he looked like he was sound, athletic, and moving:

By this time, I was on a hair-removing mission. The tail was too bulky for reality, and was blocking my view of the hindquarter symmetry, so it came off, straight away. POP! As mentioned before, there are two versions of this sculpture to be produced. The Appaloosa "rat-tail" version of this sculpture could be addressed while I let the Mustang version's new hair simmer in my head. I looked at references of this old school type of stock horse, and studied how their thin, short manes and tails could be shaped to both be aesthetically pleasing, and still pull from a ceramic mold. Van Gogh's sunflowers were picked.

Now being a short, unruly old school Appy mane, there was still hair on both sides. This helped with visual interest, too:

The tail of the Appy presented a technical problem. The horse is to be slipcast via a pourhole through the butt, and the big Mustang tail would naturally serve as the pourhole plug. However, for the follically-challenged Appy, I had to make a plug shaped like the undersides of a tail, because there wouldn't be enough hair to cover.

Perhaps you are wondering now, "Why go to all this trouble to preserve the integrity of a butthole?" The answer is, one of the major defining traits of an Appaloosa is the mottled skin of its nether regions. Therefore, Breed and Workmanship judges, as well as the collectors, will examine this part of the anatomy for accuracy.
The front end was not without its share of corrections. His bony elbow points were awash in a mush, and needed to be defined. Once they came to light, I could better get a measure on his front bone lengths, and correct one longer leg. As with the hinds, the fronts got shaved and completely new tendon structures, as well as improved knees (wrists).

All four legs got an update in another aspect that I have been struggling to understand for years. I managed to get close in my Sia sculpture, but it has eluded me in full comprehension until now. I always hated my pastern-fetlock-canon transitions. They were always blocky, and dipping in the wrong spots. I reached this by dremelling his limbs down to the bone, using the anatomy book directly, then building up tissue and tendons. Finally, this horse has pushed me past a major plateau or roadblock.
Hogging on these things, hoping a magical formula will manifest:

And it didn't.

Next try, almost there...

Achieved!

He has real bones! Uh-oh. Better add bone to that shoulder point, too. Oh, no. Another roadblock to bust through... the chest. The really gut-wrenching thing is that I thought I had finally gotten this part right. Chests have been another problem area where my brain bucked and refused to comply.

And, then, the light shone down, and improvement was made on a perceived success.

It's time to talk about his most obvious change, his head. While Mustangs can be wicked ugly, and can look like his old head did, it doesn't mean all Appies look like that. Since the structure of an App or other stock breed head can occur in Mustangs, I went the other direction. I foucsed on the client's request for old-timey, rat-tail and started looking at mid-century stock breed heads. I went heavy on the jowl, gave him small, foxy ears, and an overall wedge in shape. At the same time, I had to line up all with the features of the old head, because of the old head's scale to the rest of the body. So, I decapitated him and started a whole, new head.

And just when I thought I had it- at last!- I realized that his nasal bone was crooked and drifting into a spiral. And his cheekbones didn't match, and...

Finally, getting somewhere, but don't be surprised if it gets more changes:

Now, the turn-arounds:


Now, all that remains are some fiddly changes, like lip stuff and all the veining.
It's worth noting that all of these changes were done alone, in my studio. I didn't have critics sitting at my side, pointing... the critiques themselves were short, with maybe two words to each flaw, to sort of point me in a general direction. I had no specific measures to go by, with the exception of a saddle measurement for a real horse. This was largely about battling my own perceptions and rote bad sculpting habits. This highly recommended artist's blog entry pretty much covers the torment of changing my brain. It is so much more than just having the guts to chop, saw, dremel, and vaporize your former best. You have to sit down, make a game plan, and have an absolutely clear vision of what the end result must look like, regardless of steel armature or personal preferences. It hurts, like someone is stamping fresh hoofprints in your head. In a way, you are.

No comments:
Post a Comment